[Update: added illustration of overview.]
I originally called this post “My web development workflow” but although it is my workflow, the idea of the article was as a suggestion for one possible methodology for the kind of development with which I’m usually involved. Others I’ve worked with, both in the past and on an ongoing basis, have found this method to be both flexible and fast. Once the concepts are taken onboard, it’s also very easy to understand. Another key advantage is that it’s designed to allow work to be carried out from multiple workstations – I’m using the word “workstation” very loosely here, including mobile devices – because the working copy of the files is at a remote location. The amount of times I’ve saved somebody else’s skin thanks to that…
The whole shebang depends on certain tools of course. Some of the core elements of the setup are ubiquitous and de facto standards, such as Git, rsync, ssh, ppk, and any flavour of Unix-like OS. That brings me to the less ubiquitous elements, although within the scope of web development, they are not that far from standard. These components include TextMate, from MacroMates which also means that OS X is a required element. If you’re not based on OS X, you’ll need to replace TextMate with a suitable editing environment. If you’re using Windows, don’t. Life’s too short, really. I’ll come onto how TextMate integrates into the workflow later on.
Here’s a step-by-step rundown of the process to set this workflow up:
- create a central bare git repository
- create placeholder project file(s) in a work directory on the dev server
- initialise the working dir as a git project, configure it, and push the placeholder files to the central repo
- synchronise the remote work directory to a local directory
- open the local work directory in TextMate
- configure Remote Project for TextMate with the remote working directory
- symlink the web root of the remote working dir to a web-visible location
- use Remote Project in TextMate to keep your local version in sync with your remote version-controlled copy
- start hacking…
Seems like a lot of hassle? Well, it’s all done in seconds after the first time, and the benefits far outweigh the setup steps. Let’s go through each step in more detail.
Here’s an illustration of the overview:
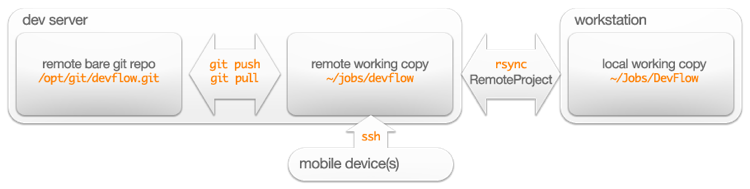
The “mobile device(s)” block can be any platform that can run ssh – your laptop, your tablet, your phone, somebody else’s gear, whatever. As long as you can run ssh and you know how to use a good text editor (make that vim!) you can edit your working copy from anywhere and commit/push your changes.
Create a central bare git repository
This is an easy one to get us started. Let’s call our project “devflow” so we have a handle for it. Create a central directory – I use /opt/git/devflow.git/ – then go in there and initialise it:
cd /opt/git/devflow.git/
git init --bare
Additionally, and predictably if you’ve ever done anything like this before, the permissions need to allow your development team read/write access to the repo. One option is create a group – I always thought “gits” had a ring to it – and set up the perms:
chmod -R g+w /opt/git/devflow.git
chgrp -R gits /opt/git/devflow.git
Now any user in the gits group can write to that repo. If you have to add a user to a group it’s as simple as
adduser {username} {groupname}
Create placeholder project files
Also simple, I usually use ~/jobs/devflow as the working directory on the dev server. Sometimes to get the ball rolling I just create a single readme.markdown file.
Initialise your working copy as a git repo
Inside your working copy on the dev server, initialise a new git repository:
git init
If you haven’t configured git yet, start by telling it a little about yourself:
git config --global user.name "A. N. Other"
git config --global user.email "another@example.com"
Once you’ve done that, you need to tell the local git repo where the central repo is – the “origin”:
git remote add origin another@devserver:/opt/git/devflow.git
Apart from the URL of the remote origin, we need to tell git what branch to use and where to find it:
git config --add branch.master.remote origin
git config --add branch.master.merge refs/heads/master
If at this point, you have a look at the config with cat you’ll see the results of the configuration we’ve just done:
cat .git/config
…
[remote "origin"]
    url = another@devserver:/opt/git/devflow.git
    fetch = +refs/heads/*:refs/remotes/origin/*
[branch "master"]
    remote = origin
    merge = refs/heads/master
We can see that the git config commands have written the items to the configuration file. It’s possible to edit this file directly as well – whatever you prefer. Another way to view the state of the configuration is to use git’s own config command:
git config -l
This lists the configuration in a compact version of the config file:
remote.origin.url=another@devserver:/opt/git/devflow.git
remote.origin.fetch=+refs/heads/*:refs/remotes/origin/*
branch.master.remote=origin
branch.master.merge=refs/heads/master
Synchronise local with remote
In your terminal – I use iTerm, but OS X Terminal is fine – change to a working directory. Once again, for this I use ~/Jobs/DevFlow or similar. Once you cd into there, just use rsync:
rsync -Chavuz another@devserver:~/jobs/devflow .
which will bring your project, such as it is, to your local machine. The switches to rsync are to ignore version control systems directories – we don’t want any git files getting local. That will likely create issues for us. The other switches are to get human feedback, use archive mode, be verbose, look for updates, and compress the files en route.
Note: this assumes you’ve set up key-based authentication on the dev server. If you haven’t step into my office…
Setting up PPK
On your local machine – let’s just drop the pretence and call it “Mac” from now on! – run this command:
ssh-keygen
Then answer with Enter (i.e. blank) to all the questions. This will create a .ssh directory in your home. The key files (see what I did there?) in there are
id_rsa
id_rsa.pub
Which as you can guess is the public key, and by elimination, the private key. The public key you can share around however you like – the worst thing that can happen is that someone will give you a login on their machine. In our case, we’re interested in the contents of id_rsa.pub. The contents of that file will be added to another file, on the remote dev server. On the dev server, the simplest thing is to do the same thing: ssh-keygen. (You don’t need to create a key on the server, but a side-effect of doing this is that the ~/.ssh directory is created for you in the right place with the right permissions. Once you have the ~/.ssh/ dir, you can add a file:
touch ~/.ssh/authorized_keys
chmod 600 ~/.ssh/authorized_keys
cat {contents of local id_rsa.pub} >> ~/.ssh/authorized_keys
What does a public key look like? Something like:
ssh-rsa AAAAB3NzaC1yc2EAAAADAQABAAABAQDFmDZzW5XHKjsV2Fo624wXOPxmLkLSKiFkoTgOIqqlu
A3eD1tBpEGvhXYfVab9MJt08w/WdNo828GDUK3bWL74tLKiKyOY+yGwaqLQlqbKti0sFHTHyN/U76aen2
3hKy9ChMc2rFXFiM73fgQQveB1vZkmMezf6xRYcm2uJFiP76aen23hKy9ChMc2rFXFiM73fgQQveB1vZk
mMezf6xiryOCYiFSHvXZBVdToOg0OtDDO6sH1L8li664CDN8KOX1UebOw2DwHIFXNqvIjZQG3+DN8KOX1
UebOw2DwHIFXNqvIjZQG37IvuAlYAR9UPT4FV9mexCxGBJ6xURmHHYRGJwqUYzJKrjqyUIpY8wlHZjqvk
doqeJlBoUrLGNiT+A/gC4kN5haj65pJDvhOU4J0ctD6b dom@macbookhair
So once the version of you that lives on the dev server has your public key it can check it on its list of authorized_keys to see whether to let you in.
You should never send the private key to anyone over any transport. And you don’t have to type a password! This is most important for scripted access, like the type that Remote Project is doing for you behind the scenes in TextMate.
Open your project in TextMate
I would recommend installing the TextMate ProjectPlus plug-in which brings us some nice additional project-handling features. See the above link for full details.
Once you install the mate shell command, this is just a question of
cd ~/Jobs/DevFlow/
mate devflow
This will open the whole directory as a project in TextMate.
Set up Remote Project
The TextMate bundle Remote Project is really a wrapper for rsync, allowing you to get from remote, put to remote and compare local and remote copies of your project.
[This section may have to change because of Remote Project’s seeming lack of availability.]
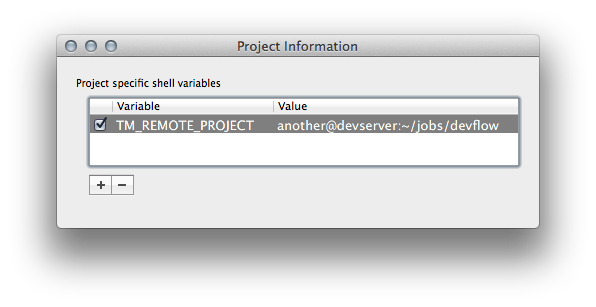
The configuration of Remote Project is handled by an environment variable: TM_REMOTE_PROJECT. This is set at the project level. Configure it to the location of the remote working copy: another@devserver:~/jobs/devflow.
This is a good point to save the TM project (⌃⌘S). I usually save it in the same directory as the root dir of the working copy. In this case, that would be ~/Jobs/DevFlow/.
Remote Project, as I have it configured, ignores the .git directory on your remote working copy, so you never get into a muddle with two competing copies of that. It also means that wherever you are you can work with the repo as long as you have access to ssh.
Symlink to a web-visible location
Back on the dev server now, we create a virtual host for our project. This is normally a subdomain, possibly a sub-subdomain, like devflow.work.domi.co.uk. This means you can configure the DNS with a wildcard record, so when a client gives you something to work on urgently out of the blue, it’s ready.
If you have your vhosts set up to live somewhere like /var/www/work.domi.co.uk/htdocs/ you can quickly symlink from there to ~/jobs/devflow and you can see your changes as soon as Remote Project uploads them.
cd /var/www/work.domi.co.uk/htdocs/
ln -s /home/another/jobs/devflow
An example snippet from an Apache Virtual Hosts configuration might be:
<virtualHost *:80>
    ServerName devflow.work.domi.co.uk
    DocumentRoot /var/www/work.domi.co.uk/htdocs/devflow
</virtualHost>
Start syncing local and remote copies of the project
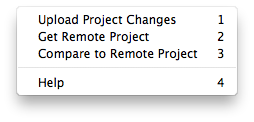
The Remote Project bundle has three main functions:
- Upload Project Changes
- Get Remote Project
- Compare to Remote Project
They do what they sound like they will do. Inside the bundle, the commands are fairly normal rsync statements. The first thing to try is the compare function – right now, there should be no difference between the local and remote. Edit the readme.markdown we created, then run the comparison again. Now we should see that the local copy is newer.

The fast way to use Remote Project is with its default shortcut: ⌃⌘P then 1 for upload, 2 for download and 3 for compare.
The confirmation of the sync is just a small tooltip next to the text cursor in the editor:

My customised Remote Project commands:
Upload (excerpt)
rsync -auCz --exclude 'phpdoc' --exclude '.git' --exclude "cache"
--exclude "logs" --exclude ".DS_Store" --exclude "Thumbs.db"
--exclude ".*.swp" --exclude "stats" --include ".gitignore"
--include ".htaccess" "$TM_PROJECT_DIRECTORY/" "$ESCAPED_REMOTE"
Download (excerpt)
rsync --delete -auCz --exclude '.git' --exclude "cache"
--exclude "logs" --exclude ".DS_Store" --exclude "Thumbs.db"
--exclude ".*.swp" --exclude "stats" --include ".gitignore"
--include ".htaccess" "$ESCAPED_REMOTE/" "$TM_PROJECT_DIRECTORY"
Obviously, in the bundle these commands are one-liners.
You’ll notice something important in the Download excerpt: that rsync has its --delete option set. This will remove any files from your local directory that aren’t present in the remote. That keeps things tidy, but it can also remove new files you’ve just created locally that you haven’t yet uploaded, so beware of that.
Other elements to those command lines are:
- we don’t upload “phpdoc”, because it’s generated automatically on the remote
- we exclude some standard things that aren’t part of the project: cache, logs, preview file, stats,
vi swap files
- we make sure .gitignore and .htaccess are included – they’re part of the project, but sometimes default
rsync configuration has them excluded
- the
-C switch to rsync is to ignore source control directories (“C” for “CVS”) and in current versions that includes git, but not all versions of rsync know about git, so we explicity --exclude it as well.
Conclusion
Now you’ve got to this point, you can work locally, with the advantages that brings – being able to view files in Finder, save directly and so on – and handle the versioning remotely in a shell, as it should be! And while you’re working, everything is visible at a development URL that is as close as possible to how the production site will be, because it’s at the root of an Apache Virtual Host, with as much of the configuration exactly the same as the final destination for the project’s hosting.
